Showing posts with label baking. Show all posts

Sunday, February 22, 2015

No-Roll Hamantaschen

Last year, I made these rainbow hamantaschen. (I wasn't in the mood to blog.)


One of the coolest parts of this recipe (besides how they look!) was the way in which the dough circles were created. It was basically a slice-and-bake cookie (with a little more work along the way).

This year, I saw this recipe, and I realized that this rolling-out-the-dough thing could be done in a different way.
How hamantaschen dough is typically rolled out
So that's exactly what I tried.
After making any one of my regular hamantaschen doughs (Aunt Dora's, cream cheese, and chocolate -- I made one of each), I put the dough into a piece of parchment, rolled into a log, wrapped it tightly into the parchment, and refrigerated.

When I was ready to make hamantaschen, I took the logs out of the fridge one at a time, and sliced them.

Let me suggest that you give the "logs" a little extra roll when you take them out to ensure a good round circle shape. Also, I wanted them a little larger, so I used my palm to press each dough piece into a slightly flatter and more circular shape.


I was so surprised at how quickly I was able to prepare lots and lots of dough circles for the kids to fill! I may never roll hamantaschen dough again!


Each year, I like to try something new. This year, I was inspired to try this Oreo-Cookie Dough. (I tried out this dough recipe and it was good, but I would probably use one of my own doughs, and add in the crushed oreos.) I did not use the suggested filling, but instead went and found an imitation oreo cookie filling (I used this one here, and froze it before using it, to make sure it wouldn't run when baking.)

The verdict? The oreo dough was delicious. The filling was also delicious. The filling went well in the chocolate dough as well.
OREO cream-filled chocolate hamantaschen....


If you're still looking for hamantaschen ideas, here are some of my previous posts on the subject:
Great-Aunt Dora's Dough Recipe (a basic, wonderful, forgiving dough recipe) 
Yeast Dough 
Chocolate Dough
 Cream Cheese Dough
 Hamantaschen Tips and Tricks
Thin-Mint-inspired Hamantaschen
And if you don't like hamantaschen, try these Palmiers for Purim.

Thursday, February 21, 2013

Hamantaschen 2013

Every year we make a lot of hamantaschen. I love them. I love to share them with friends and family.

Many people make amazing themed mishloach manot.
I just give out hamantaschen.

I think it's okay.

So this year we made a lot of "normal" hamantaschen. A few batches of my Aunt Dora's recipe and a few batches of cream-cheese dough. One batch of yeast dough, too.
My brother is visiting from Israel and he helped with a lot of the fun!
Bubbie (my mom) made a whole bunch of filling for us!
Zeyde (my dad) approves

Why yes, they ARE playing with flour. Doesn't everyone?

And as usual, I wanted to try something new.

I was totally inspired by this post from Pragmatic Attic, Midnight Mint Hamantaschen.

But since I already have a chocolate dough that I know and love, my brother suggested that we just replace the vanilla with mint extract. And since I'd already bought the Special Dark Cocoa, I used that too. Just the dough was pretty darn yummy. Then we added the mint ganache as filling and they were outstanding.


Maybe other new ideas coming, we'll see!

If you're still looking for hamantaschen ideas, here are some of my previous posts on the subject.

Great-Aunt Dora's Dough Recipe (a basic, wonderful, forgiving dough recipe)
Yeast Dough
Chocolate Dough
Cream Cheese Dough
Hamantaschen Tips and Tricks
And if you don't like hamantaschen, try these Palmiers for Purim.

P.S. Hamantaschen are GREAT for breakfast. Just ask Solly:

Wednesday, February 6, 2013

Banana Oatmeal Muffins {Recipe}

also known as...The End of a Blender Era

Today happens to be my wedding anniversary. Thirteen years.

It seems like a long time, and then it feels very short....isn't that how time just goes?

I still have a few of my wedding presents, including my blender.
It was very nice.
I liked it a lot.
Tonight, I killed it.
Poor blender. RIP
While making these muffins.

Banana-Oatmeal Muffins (based on this recipe that I found on Pinterest)

Preheat oven to 400 degrees
Spray muffin pan with nonstick cooking spray.
Into your blender, put:
1 cup Greek yogurt
2 eggs
3/4 cup sugar
1 1/2 tsp baking powder
1/2 tsp baking soda
2-3 ripe bananas
1/2 tsp cinnamon
pinch of salt
(optional: 1 tablespoon PB2 powder, if you happen to have it and like peanut butter as much as I do)

Blend them all together.
Then add 2 1/2 cups of old-fashioned oatmeal about 1/2 a cup at a time.

Pour it all into the muffin pan.
Bake about 15 minutes until a toothpick comes out clean.
Remove immediately from the pan and cool.

They are quite yummy.
Almost worth the new blender I'm going to have to get!

Nom nom nom....

Friday, January 18, 2013

2 Bowls?!

I got a new mixer this year (long story) and I really love it. It's just a bigger version of my old one, but it's shiny and red.

For my birthday, two of my friends bought me a second bowl for the mixer.

My dad's comment? "If anyone needs two bowls for a mixer, it's you."

Truthfully, I wasn't totally sure that anyone needed two bowls. Then again....when you need 2, nothing else will do!

So I got my hands on the library's copy of the Smitten Kitchen cookbook (which I'm now planning to buy, by the way). It was beautiful. Even more beautiful than her blog, if that's possible. (My only complaint? Many of the recipes are on multiple pages -- this recipe that I'm about to talk about had the ingredients on one page and the instructions on the next, so I was constantly going back and forth. I *might* have made the library's copy a tiny bit sticky....)

Inside the cookbook was a recipe for Gooey Cinnamon Squares.

Put the word "gooey" and "cinnamon" together and I'm totally sold.

Once I read the somewhat fiddly recipe, I was less excited but I decided this was a perfect opportunity to try out my second bowl for the mixer.

They were delicious, although not as pretty as the ones in the cookbook.


Recipe, slightly adapted:

Cookie Base
1 1/2 cups all-purpose flour
1 teaspoon cream of tartar
1/2 teaspoon baking soda
2 teaspoons baking powder (instead of the cream of tartar and soda)
1/4 teaspoon salt
1/2 cup (1 stick) unsalted butter, room temperature
3/4 cup sugar
1 large egg
1/4 cup milk
 
Gooey Layer (it just *sounds* delicious)
1/4 cup light corn syrup
1/4 cup milk
1 tablespoon vanilla extract
12 tablespoons (1 1/2 sticks) unsalted butter, room temperature
1 cup plus 2 tbsp sugar (225g - this is a good place to use your kitchen scale)
1/4 teaspoon salt
1 large egg
1 1/4 cups all-purpose flour

Topping
2 tbsp sugar
1 1/2 teaspoons cinnamon

Directions

1. Heat oven to 350 F. Line the bottom of a 9-by-13-inch cake pan with parchment, allowing the ends to hang over at least 2 inches. Coat pan and parchment with cooking spray. Set aside.
2. Make the cookie base: Stir together the flour, cream of tartar, baking soda, and salt; set aside. In an electric mixer, cream the butter and sugar until light and fluffy, 2 min. Add the egg and milk and beat until combined. Stir in flour mixture until just incorporated. Spread dough into an even layer in the prepared pan; set aside. (This was tricky, I used my fingers)
3. Make the gooey layer: Whisk together the corn syrup, milk, and vanilla in a bowl and set aside. In an electric mixer (second bowl but you could probably just wipe out the first bowl) cream butter, 1 cup sugar and salt until fluffy. Add the egg and beat until combined. Add the flour and corn syrup mixture by thirds, mixing each time until all ingredients are incorporated. Dollop over the cookie base and spread into an even layer. (Less tricky than the first spread!)
4. Mix together 2 tbsp sugar and cinnamon; sprinkle over the gooey layer. Bake until edges have set and center is still gooey, 35 min. Let cool completely, about 3 hr. Lift from pan using the parchment; cut into 1-inch squares. Can be kept covered at room temperature for 3 days...bwah ha ha. If they last that long. And just *TRY* not to eat them warm. I dare you.

Yum.

Sunday, December 9, 2012

{36 reasons} New Mixer


Blessed are You, O God, who has created butter, sugar and flour, and who has helped us to put them together in delectable concoctions that taste even better when made with someone you love.

Tuesday, November 27, 2012

{36 reasons} Mitzvah Baking

One of my plans for Tuesdays during this project was to try out new recipes.
Except...yesterday, my kids came home with a flyer about a project that our school and community are doing to honor the local military servicemen and women. They wanted desserts.

And of course, David says, "so, what are we going to make?"

How does a mama say no to that?!
I guided him to choose our tried-and-true brownie recipe*, pointing out that we know how it comes out and how much it will yield.

And so we baked brownies tonight. Two large batches. David did a lot of the work.

At first I wasn't even going to write about this. Does it fit as a "shehecheyanu moment"? I might be thinking a little loosely here, but there were many pieces of it that gave me pause for blessing.

1. David automatically assumed that we would participate in this kind of philanthropic event.
2. We had all the supplies on hand in our well-stocked pantry.
3. David has the skills and ability to put together a brownie recipe.
4. I was able to teach him new skills in the baking process.

Blessed are You, O God, who gives us the ability to give in so many ways, who fills our lives with plenty and allows us to share it, who gives me the joy of sharing my passions with my children, and who has brought me to this day.

*Tried-and-True Favorite Sommer Brownie Recipe is the "On The Fence Brownies" from the King Arthur Flour Baker's Companion. The link takes you to a recipe on their blog that is almost the same - with the addition of espresso powder. I don't use the espresso.

Tuesday, March 6, 2012

Purim Palmiers

I didn't even know what a palmier was.
My friend Barrett mentioned that she had made them for Purim, using Tina Wasserman's recipe.

I looked it up...and, oh my, they sounded delicious.
Thank goodness for Google, since I could look it up without feeling stupid. Oh, but now I've told all of you....okay. Well... you love me anyway, right? 
Plus, I had two packages of puff pastry languishing in my freezer.
(I think that Purim is a baking holiday just to help us get rid of the chametz right before Passover!) 

So I learned a little about palmiers. They are a French-Jewish Purim treat that are meant to represent Haman's misshapen ears. (Purim has so much silliness.)

Oh, and they do taste amazing. Purim is all about delicious.

 Tina's recipe is here. It was super easy.

 My recommendations - it took longer that 30 minutes to defrost the puff pastry to be workable. Almost an hour. I thought I'd be able to roll out hamantaschen while waiting for them to freeze, bake, etc, but it seemed silly to clean up all that sugar on the board so I couldn't really multi-task. They baked for much shorter than the time suggested, only about 8 minutes on the first side and 3 on the second side so watch your oven.

Rolling up the puff pastry:
What they look like all rolled up:

After rolling, you freeze them for 30 minutes and then slice and flatten them out:


The finished product:
 
The verdict:
2 out of 4 of my kids loved them.
I am a big fan and planning to make them a new part of my Purim baking routine!
I'm not giving up on hamantaschen though.

Monday, February 20, 2012

Fancy Rainbow Cake

Although we had parfaits at the Fancy Nancy party (post coming soon)...I wanted to try one of these cakes that I have seen on Pinterest (yes, Pinterest strikes again. I wonder how many blog posts across the wide internets have started with that sentence!)

I thought it would be super fancy!

And it was.

The cake wasn't complicated but it still felt like a challenge.

Two cake mixes, six layers, two batches of frosting...and a whole lotta food coloring. I like gel colors to get the Rainbow Brite effect...

It looked so cool just like this....
 But we frosted it and it looked good too....I had some helpers with the decoration....
 She was so excited for the big reveal...I loved having a big secret....
 Wow!

I know I say this almost every time I make a cake, but I think this one might be the coolest I've ever done. It was completely worth all the work - a smashing success! (which is a fancy way of saying: go me!)

Tuesday, February 7, 2012

#TuBishvat Green Smoothie & Date-Fig Bars


In honor of Tu BiShvat we had green smoothies...


Simple recipe - bananas, milk, a little chocolate syrup (mostly because they were watching and insisted) and a little whipped cream on top (because, of course, it's a holiday!)

I can't believe that my oldest, who won't ever eat a vegetable, drank this smoothie.

And an easy way to celebrate the greenest of green holiday!

(We had these smoothies on Erev Tu Bishvat and we're going to make them again for the big day...okay, it might become a regular thing.)

We also had delicious date-fig bars.
Adapted from King Arthur Flour Cookie Companion's Bakery Date Squares

Date-Fig Bars:

Filling:
3 cups of chopped dates and figs *the original called for only dates, and had a variant filling recipe using figs and orange juice, but I just mixed up dates and figs for that Tu Bishvat flavor!
1 cup of water
1/4 tsp salt
1 tablespoon plus 1 teaspoon lemon juice
2 teaspoons vanilla

In a saucepan, combine the stuff, bring to a boil, reduce heat to low, and simmer for about 5 minutes. The mixture will thicken after a few minutes. Remove from heat and set aside to cool. I ran the immersion blender through it to give it a nice smooth texture and let it sit for a while.

Crust:
1 1/2 cups rolled oats
1 1/2 cups whole wheat pastry flour (or all-purpose)
1 cup brown sugar
3/4 tsp baking soda
3/4 tsp salt
3/4 cup unsalted butter, melted
1/2 cup chopped walnuts or pecans

Whisk together the dry ingredients (except the nuts) and then add the melted butter. Stir until well combined.

Lightly grease a 9x9 inch pan and press 2 1/2 cups of the crust mixture into the pan, smoothing it out to fill the bottom with no gaps. Spread the filling on the crust. Add the nuts to the remaining crust mixture and sprinkle it over the filling.

Bake for 30 minutes at 350 degrees, until golden brown. Let cool before cutting.


What treats will you have (or did you have) for Tu BiShvat?

Friday, November 25, 2011

Kiwi Bread?

Me: So, guys, I got a new oven. What should we bake to test it out?
Sam: Kiwi bread! 
Me: Um...what's kiwi bread?
Sam: You know, kiwi bread! It's so yummy. Make kiwi bread.
Me: Yeah, that doesn't help much...do you know what kiwi is?
Sam: Yes, it's green.
Me: {totally puzzled}
Sam, after a few minutes of thought: OH! I mean ZUCCHINI bread! 

Right.

I couldn't find the recipe that I know I've used in the distant past (um, at least a year ago...how does he remember these things?) so I turned to Smitten Kitchen. Her recipes are always winners. This one was no different. Definitely a keeper.

(I left out the nuts and raisins. My kids are purists.)

The only edit I made was to coat the inside of the pan, after greasing, with cinnamon sugar. Which just makes it even better.

Delicious.
Now, does anyone have a recipe for Kiwi Bread?

Friday, January 14, 2011

The Tu B'Shevat Spirit

The holiday of Tu B'Shevat is coming - the birthday of the trees!
We've had lots of fun over the years with Tu B'Shevat, it's one of my favorite holidays. One year, I made green pancakes for breakfast. And of course, other fun tree/earthy sorts of activities.

But this year, I saw a great post from a friend on Facebook, showing me her Tu B'Shevat challah. It was gorgeous (she's quite a cook AND lucky for me, she lives in Europe so her Shabbat prep started way before mine...) so I thought I'd give it a try.

Here's my not-so-tree-like (but if you squint really hard and use your imagination...) Tu B'Shevat challah:

Can you see the tree in there?

And thanks to LeighAnn, because of her challah post, I now always braid with 6 strands - one for each member of our family. What a sweet and wonderful idea. (Oh, and a thank you to Tina Wasserman, for teaching me how to braid a six-braid challah.)

Hopefully more Tu B'Shevat posts coming this week as the holiday approaches...bli neder.

Tuesday, November 23, 2010

No Pain, No Gain

I'll bet you're guessing that this title has to do with exercising.

You'd be wrong.

In fact, it has to do with the fact that what appears to be a fiddly, overly-complicated recipe is actually worth the time and effort.

Today, this month's Family Fun magazine showed up at my door. A friend was visiting, and we paged through it. She noted that "Chocolate Surprise Cookies" sounded good, so I said...let's bake! This was before reading the recipe, which was too bad, since she didn't actually get to taste the final product (too many steps taking too much time before she had to leave.)

It was really too bad.

Because these were totally worth all the steps.

I can't find the Family Fun version of the recipe anywhere online, but I see that Nosh With Me has a similar one posted on her website. Here's the one that I made, adapted from the Family Fun magazine:

Chocolate Surprise Cookies
Makes 20 - which is actually accurate

2 cups flour
1 cup cocoa powder
3/4 tsp salt
1/2 tsp cinnamon
1/2 tsp baking powder
1/2 cup plus 2 tablespoons unsalted butter, softened
1 cup brown sugar
1 egg
1/2 cup milk (I used the 1% that we have in the house. The recipe called for whole milk. I can't imagine how it could matter.)
2 tsp vanilla extract
10 marshmallows, cut in half

Heat oven to 350. Sift together the flour, cocoa, salt, cinnamon, and baking powder. Set aside.

Using a mixer on medium high speed, cream the butter and sugar for about 3 minutes. Add egg and beat for another minute. Combine milk and vanilla. Turn the mixer to low and add half the milk. Then slowly add half the flour mixture, then the remaining milk mixture, and then the remaining flour. Mix until well-blended.

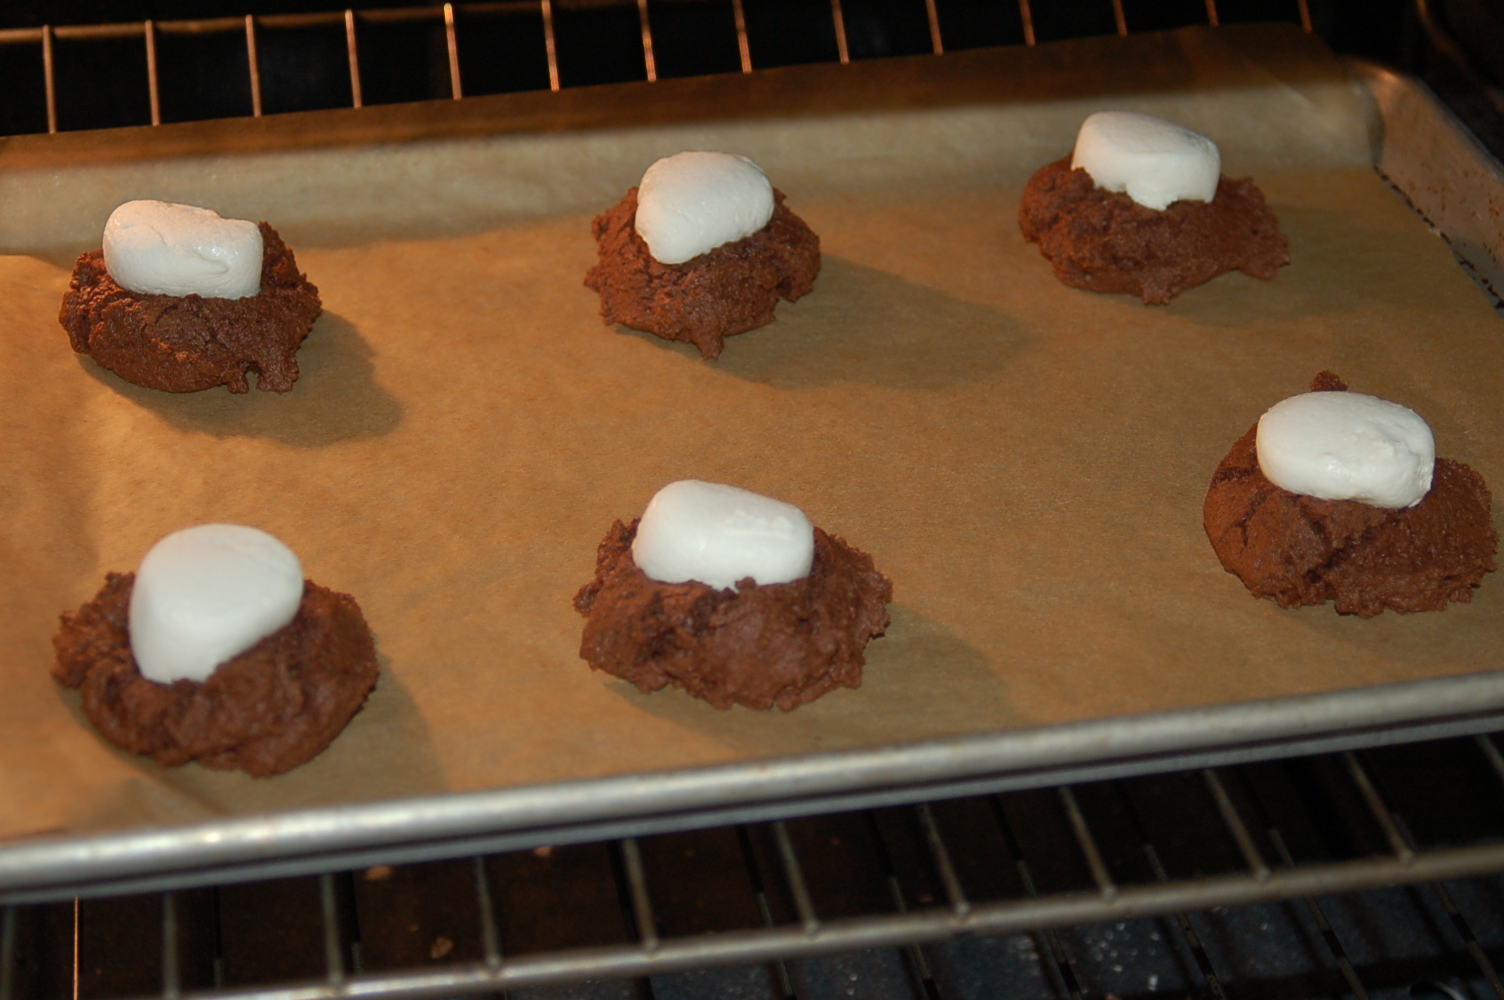
Line a cookie sheet with parchment. Scoop out 2-tablespoon size balls, drop them onto the sheet. I did about 6 per sheet, leaving about 3 inches between them. They don't spread much. Bake for 10 minutes. Remove from the oven, top each one with half a marshmallow, cut side down, pressing it into the dough. Bake for an additional 4 minutes, then cool on a rack.

See what I mean? Not so much spreading. Could have fit more on the sheet, I guess.
Then make icing:
3 cups powdered sugar
1/3 cup cocoa powder
1/2 cup sour cream (I used reduced fat, because that's what I had)

Whisk together the sugar and cocoa powder, then stir in the sour cream until smooth. It seems like it won't work, but it does, trust me. Then top the cookies with the icing so the marshmallow is totally covered. Set for about 1 hour and then eat. With a huge glass of milk.
It makes a ton of icing but trust me, you'll want all the icing. The cookies are not really worth eating without the icing.
  
 Delicious!
 I'm now glad that we made them, but in the middle I was wishing I had read the recipe more carefully before deciding so quickly to make them! I have a feeling they're going to be requested again soon by my children.... What's your favorite fiddly-but-worth-it recipe?